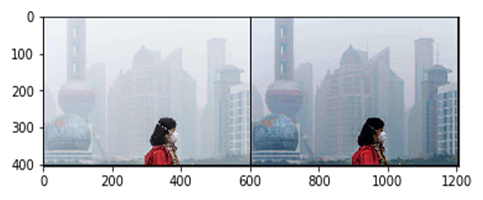
这节我们介绍利用一个预训练模型清除图像中雾霾,使图像更清晰。
26.1 导入需要的模块
|
1 2 3 4 5 6 7 8 9 10 |
import torch import torch.nn as nn import torchvision import torch.backends.cudnn as cudnn import torch.optim import os import numpy as np from torchvision import transforms from PIL import Image import glob |
26.2 查看原来的图像
|
1 2 3 4 5 6 7 8 |
import matplotlib.pyplot as plt from matplotlib.image import imread %matplotlib inline img=imread('./clean_photo/test_images/shanghai01.jpg') plt.imshow(img) plt.show |
26.3 定义一个神经网络
这个神经网络主要由卷积层构成,该网络将构建在预训练模型之上。
|
1 2 3 4 5 6 7 8 9 10 11 12 13 14 15 16 17 18 19 20 21 22 23 24 25 26 27 |
#定义一个神经网络 class model(nn.Module): def __init__(self): super(model, self).__init__() self.relu = nn.ReLU(inplace=True) self.e_conv1 = nn.Conv2d(3,3,1,1,0,bias=True) self.e_conv2 = nn.Conv2d(3,3,3,1,1,bias=True) self.e_conv3 = nn.Conv2d(6,3,5,1,2,bias=True) self.e_conv4 = nn.Conv2d(6,3,7,1,3,bias=True) self.e_conv5 = nn.Conv2d(12,3,3,1,1,bias=True) def forward(self, x): source = [] source.append(x) x1 = self.relu(self.e_conv1(x)) x2 = self.relu(self.e_conv2(x1)) concat1 = torch.cat((x1,x2), 1) x3 = self.relu(self.e_conv3(concat1)) concat2 = torch.cat((x2, x3), 1) x4 = self.relu(self.e_conv4(concat2)) concat3 = torch.cat((x1,x2,x3,x4),1) x5 = self.relu(self.e_conv5(concat3)) clean_image = self.relu((x5 * x) - x5 + 1) return clean_image |
26.4 训练模型
|
1 2 3 4 5 6 7 8 9 10 11 12 13 14 15 16 17 18 19 20 21 22 23 24 |
device = torch.device("cuda:0" if torch.cuda.is_available() else "cpu") net = model().to(device) def cl_image(image_path): data = Image.open(image_path) data = (np.asarray(data)/255.0) data = torch.from_numpy(data).float() data = data.permute(2,0,1) data = data.to(device).unsqueeze(0) #装载预训练模型 net.load_state_dict(torch.load('clean_photo/dehazer.pth')) clean_image = net.forward(data) torchvision.utils.save_image(torch.cat((data, clean_image),0), "clean_photo/results/" + image_path.split("/")[-1]) if __name__ == '__main__': test_list = glob.glob("clean_photo/test_images/*") for image in test_list: cl_image(image) print(image, "done!") |
clean_photo/test_images/shanghai02.jpg done!
26.5 查看处理后的图像
处理后的图像与原图像拼接在一起,保存在clean_photo /results目录下。
|
1 2 3 4 5 6 7 8 |
import matplotlib.pyplot as plt from matplotlib.image import imread %matplotlib inline img=imread('clean_photo/results/shanghai01.jpg') plt.imshow(img) plt.show |

虽非十分理想,但效果还是比较明显的!
本章数据集下载地址(提取码是:1nxs)
更多内容可参考:
https://github.com/TheFairBear/PyTorch-Image-Dehazing
